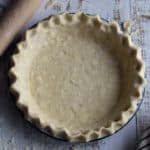
All Butter Pie Crust
The secret to a great New England pie is a from-scratch, All Butter Pie Crust! My recipe uses simple ingredients to create a deliciously flaky crust for all your favorite fillings. Get my recipe and how-to guide here. (For measurements in grams, click the Metric tab in the Ingredients section.)
Servings: 8 servings
Calories: 347kcal
Equipment
- Large bowl
- Sharp knife
- Pastry cutter
- Bench knife or bench scraper
- Rolling Pin
Ingredients
- 2½ cups all-purpose flour (10.63 ounces)
- 1 teaspoon salt
- ¼ teaspoon ground cinnamon
- 8 ounces unsalted butter, cold (1 cup or 2 sticks)
- 1 teaspoon pure vanilla extract
- Ice water
Instructions
Get organized:
- Have your work area ready before starting; it should be a clean area large enough to roll out the dough. Have ingredients and tools set out and ready to go. Keep the butter and ice water in the fridge until you need them.
Combine the dry ingredients:
- Combine the 2½ cups all-purpose flour,1 teaspoon salt, and ¼ teaspoon ground cinnamon in a large bowl.
Cut in the butter:
- Slice the 8 ounces unsalted butter, cold into very small cubes—about ¼-inch sized. The way I do this is to slice the stick of cold butter lengthwise into 3 planks, then turn them on their side and cut the planks into four sticks. Then, slice straight down from one end to the other to cut the butter sticks into cubes.
- Add the butter cubes to the flour mixture. Break them apart and toss them until they're coated in flour.
- Work the butter into the flour using a pastry blender: press it down through the butter and flour repeatedly, until the mixture is shaggy and crumbly.
- You want to have visible pieces of butter no larger than a pea. For any pieces bigger than this, squeeze them between your fingers to flatten and break them apart.
Add the liquids:
- Add the 1 teaspoon pure vanilla extract to the bowl.
- Then, add 4 tablespoons of the Ice water to the mixture. Use a spoon to toss it into the flour mixture.
- Add another tablespoon of ice water and toss the mixture again. Continue adding ice water one tablespoon at a time and tossing, just until the dough starts clumping together.
- (On dry days, you'll need more water; on humid days, you'll need less.)
- Once you see the dough begin to clump together, squeeze a handful of it: if it holds together with little to no crumbliness, it's ready—stop adding water.
Give it a few squeezes:
- Turn the contents of the bowl out onto a lightly floured surface. Squeeze the pile together with your hands a few times.
- Use your bench scraper to get under the pile: pull the mixture up and fold it over the top. Flatten it with your hands and then repeat. Do this four to five times until the dough has just come together. Do not overwork the dough.
- (There will be pieces of butter visible in the dough, which is good: that's what will make a flaky crust.)
Divide and chill:
- Divide the dough in half. Flatten each half slightly with the palm of your hand; wrap them in plastic wrap. Chill the dough portions in the fridge for 30 minutes.
YIELD:
- My All Butter Pie Crust recipe makes enough dough for 1 double-crust pie or 2 single-crust pies; about 24 ounces of dough.
TO STORE:
- Refrigerate: Wrapped portions of dough can be stored in the fridge for up to three days.
- The dough will be very hard. To make it workable, bang it with a rolling pin to help soften the dough.
- Freeze: Wrap the dough disks well and freeze them up to 3 months.
- To thaw, move the dough portions to the refrigerator. Allow them to thaw overnight.
OPTION—FOOD PROCESSOR:
- After combining the dry ingredients pour them into the bowl of a food processor. Cube the butter and add this in.
- Pulse the food processor several times until the butter has been cut into the dough. It should have a shaggy appearance.
- Add the vanilla. With the food processor running on low, spoon the ice water in a tablespoon at a time. Continue adding tablespoons of water until the dough JUST comes together.
- Turn the dough out of the food processor and squeeze it together one or two times. Divide and refrigerate it as instructed above.
VARIATION—SAVORY PIES:
- Omit the cinnamon and vanilla extract. Add a teaspoon of dried thyme to the flour mixture before cutting in the butter.
- This savory version is delicious with pie fillings of meat, cheese, vegetables, and eggs (like quiches). You can also use the dough to make appetizers like savory twists or crackers.
ROLLING OUT ALL BUTTER PIE DOUGH:
- Take a chilled disk of dough from the fridge. Set it on a floured work space and sprinkle a little flour over the top. The dough will be very firm when it first comes out of the fridge, but it will quickly become workable.
- Place your rolling pin in the middle of the dough and roll towards the outer edge.
- Pick up the dough and rotate it a quarter-turn. (Don't flip it: keep the same side up the whole time.)
- Dust a little flour under the dough if it's sticking. Roll the dough again, starting in the center and rolling towards the outer edge.
- Continue these steps of rolling and rotating, until you have a circle of dough that's ¼-inch thick and large enough for your pie.
FITTING THE PIE DOUGH INTO THE PIE PLATE:
- Cut out a circle large enough for your pie pan. Gently drape an edge over your rolling pin, then use the pin to lift the dough up and into your pan.
- Press the dough along the bottom of the pie plate. Then, press it up along the sides; there should be pie dough hanging over the sides all around.
- Lightly cover the pie shell with plastic wrap and pop it in the fridge while you roll out the top crust.
BLIND BAKING THE PIE CRUST:
- Once you fit the pie dough into the pie plate, trim the overhanging dough to about an inch. Roll the dough edge under itself, then firmly crimp it down all around the edge of the pan.
- Gently press a piece of foil or parchment paper into the pie shell, then fill it about ¾ of the way with pie weights or dried beans. Refrigerate the pie shell for 30 minutes while preheating the oven to 375°F.
- Bake the pie shell for 20 minutes. Then, remove the pie weights and foil/parchment. Prick the bottom and sides of the pie shell all over with a fork.
- → For a pie that you will bake after filling: Bake the pie shell for 5 minutes longer, then remove it from the oven. Allow the pie shell to cool slightly before filling and baking.
- → For a pie that does NOT get baked again: Bake the pie shell for 10 minutes longer until it is golden-brown all over. Remove it from the oven. Let the pie shell cool completely before filling.
ADDING A TOP CRUST:
- After you add your filling to the unbaked pie shell, roll out the top crust using the same technique you did for the bottom crust (roll from the middle; make a quarter-turn after each pass).
- Cut out the circle size appropriate for your pan. Make any decorative cut-outs in the dough now. Use the rolling pin to gently lift up the dough and drape it over the top of your pie.
- Roll the edge of the top crust under the edge of the bottom crust, and do this around the entire pie. Firmly crimp the edge down to the rim of the pie pan.
- Lightly cover the pie with plastic wrap and refrigerate it for 30 minutes before baking.
Notes
- The prep and chill times are for making the dough only. Plan extra time for rolling dough and making your pie.
- The vanilla extract and cinnamon can be omitted if you prefer, but give them a try; they're delicious with all kinds of sweet pie fillings.
- This all butter crust puffs up a lot during baking. Very intricate cut-outs may lose some definition.
- Cold butter is the most important part of a successful pie crust. Keep your butter in the fridge until you need it.
- Bake this crust at a higher temp to start: for the first 20 minutes, bake the pie at 400°F, then reduce the heat to 350°F to finish baking to a beautiful, golden brown color. This hotter initial burst helps the crust puff up to make those beautiful layers.
- Based on techniques I learned at the King Arthur Baking Company Education Center.
Nutrition
Serving: 1serving | Calories: 347kcal | Carbohydrates: 30g | Protein: 4g | Fat: 23g | Saturated Fat: 15g | Cholesterol: 61mg | Sodium: 494mg | Potassium: 49mg | Fiber: 1g | Sugar: 1g | Vitamin A: 708IU | Calcium: 13mg | Iron: 2mg
