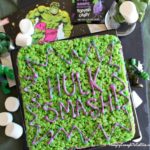
Hulk Smash! Rice Krispie Treats
These gooey treats are fun to make, and as green as the Hulk himself! Comic fans of all ages will love a bite of Hulk Smash! Rice Krispie Treats.
Servings: 9 servings
Calories: 252kcal
Ingredients
- 3 tablespoons butter, unsalted, plus 1 tablespoon extra for greasing
- ¾ cup green Candy Melts pieces, divided
- Green food coloring
- 10 ounces large marshmallows (about 40 marshmallows)
- 6 cups crisped rice cereal
- 4 packages purple Pop Rocks candy (.33-ounces each)
- Purple sprinkles (optional)
- ½ cup purple Candy Melts pieces
Instructions
Make the marshmallow-cereal mixture:
- Use the extra tablespoon of butter to grease the bottom and sides of an 8 x 8-inch pan, and also a rubber spatula.
- In a large pan, melt the 3 tablespoons of butter over low heat. Add in ¼ cup of the green Candy Melts and the food coloring and stir to combine them.
- Add in the bag of marshmallows and stir everything over low heat until the marshmallows are melted. The sauce should be smooth and blended. Remove the pan from the heat.
- Add in the crisped rice cereal. Use the buttered spatula to stir and coat the cereal with the marshmallow mixture
Spread it in a pan:
- Spread HALF of the marshmallow-cereal mixture in the bottom and to the edges of the prepared pan: I find it easiest to do this with buttered hands but you can also use the buttered spatula.
- Sprinkle the 4 packages of Pop Rocks in an even layer over the cereal. If you are using purple sprinkles you can add them here as well.
- Then top these with the rest of the marshmallow cereal, pressing it into an even top layer that goes all the way to the edges. Leave the pan on a cooling rack to set and cool for 30 minutes.
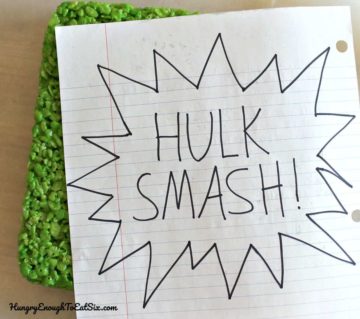
Plan the writing:
- While the pan is cooling you can cut out an 8-inch square piece of paper to plan out how your lettering and decoration will look. Write out "HULK SMASH!" in the center, in all caps and with the letters all the same height, and then draw the pointy border around the lettering.
- Invert the contents of the pan onto a serving dish. The square should be cooled and set. Assemble the piping bag and #6 tip and have it ready to fill.
- Melt the remaining green Candy Melts in a microwave-safe dish in 20-second bursts, stirring after each, until they are melted and smooth. Scoop this immediately into the piping bag: a little may seep through the tip but you'll still have plenty to pipe with.
Pipe the words and decoration:
- Pipe the words "HULK SMASH!" into the center of the marshmallow-cereal square, and then pipe the pointy border around it, following the plan you made on paper. Let this set for about 5 minutes.
- (Note: the Candy Melts harden pretty quickly, so don't try filling the piping bags in advance.)
- Assemble another piping bag and the #4 tip and have it ready to fill. Melt the purple Candy Melts in a microwave-safe dish in 20-second bursts, stirring after each, until they are melted and smooth.
- Scoop this immediately into the piping bag: a little may seep through the tip but you'll still have plenty to pipe with. Pipe the purple melts over the green lettering and the pointy border: this will give great contrast and dimension to the decoration.
Serve:
- Once the candy melts are set and hard, the treats are ready to be served. Or, you can cover them with plastic wrap and hold them until your party begins. When you are ready to serve the individual squares, use a buttered, sharp knife to slice out 9 squares.
- The treats will keep, wrapped tightly for up to 3 days.
Notes
- Any food coloring you have on hand that is typically available in the grocery store will be fine to use in this recipe: just add drops until you reach a bright shade of green. What I use is the Wilton Color Right kit and I have been happy with the quality of the color, and especially the color chart they provide to get the perfect shade.
- For the piping I used two colors of Candy Melts in a piping bag with a #6 tip for the green and a smaller #4 tip for purple. If you don't have piping tips you can use Ziploc baggies and snip off corners to pipe.
- The melted Candy Melts run through the tips quickly. Though you have to handle the piping bags with melts carefully, I still found them easy to use. Wilton even makes special tips and bags for Candy Melts that you can pop right in the microwave, and they're not too expensive. If you'd rather, you can also try pre-loaded tubes of icing available at grocery stores for the decoration.
Nutrition
Serving: 1serving | Calories: 252kcal | Carbohydrates: 45g | Protein: 1g | Fat: 8g | Saturated Fat: 6g | Cholesterol: 10mg | Sodium: 73mg | Potassium: 14mg | Fiber: 1g | Sugar: 27g | Vitamin A: 117IU | Calcium: 2mg | Iron: 1mg