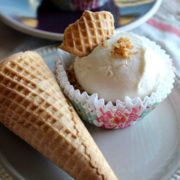
Maple Black Raspberry Mini Icebox Cakes
These miniature icebox cakes have flavors of Vermont maple, black raspberry, and sugar cone! It's one of my favorite creemee flavors!
Servings: 12 servings
Calories: 274kcal
Ingredients
- 12 sugar cones
- 4 tablespoons butter, melted
- 8 ounces cream cheese, softened
- ½ cup + 2 tablespoons confectioner's sugar, divided
- ¼ cup black raspberry jam
- 1 cup whipping cream, very cold
- ⅓ cup Vermont maple syrup plus extra for drizzling
Instructions
- Place the bowl and whisk attachment for a stand mixer into the freezer to chill.
Make the crumb base:
- Place 11 of the sugar cones into a food processor and grind them into fine crumbs. (Hold the last cone aside to use for garnishing the finished cakes.) Pour the crumbs into a medium bowl. Add in the melted butter and stir through until the crumbs are moistened.
- Line a 12-cup cupcake pan with 2-3 paper lines per cup (the extra liners help keep the moist ingredients from seeping, and make the cakes sturdier for serving. I like to use plain white liners on the inside and a decorative liner on the outside.)
- Divide the moistened crumbs between the 12 muffin cups (add in a tablespoon at a time until all the crumbs are used.) Press the crumbs into the bottom of the cups: if you have a mini tart tamper, you can use it. The bottom of a regular spice bottle works, too.
Make the black raspberry filling:
- In a medium bowl, beat together the softened cream cheese, ⅓ of a cup of the confectioner's sugar, and the black raspberry jam. Blend it until everything is mixed well and the mixture is smooth. Set this aside.
Make the maple cream filling:
- Assemble the chilled mixer bowl and whisk attachment onto the mixer. Pour the whipping cream into the bowl and turn the mixer on medium speed. Beat the cream until you see it just begin to thicken.
- Pause the machine to add in the remaining confectioner's sugar and the maple syrup. Continue beating the cream until it is thick and has stiff peaks - stop beating as soon as you see this. Depending on how cold your cream and equipment are and the speed of your mixer, the cream should be ready anywhere from 2-5 minutes.
Assemble the cakes:
- Spring-loaded ice cream or cookie scoops if you have them, work well to fill these cakes.
- Add a scoop of the black raspberry filling onto the sugar cone crumb layer in each muffin cup - it will be about 1½ tablespoons in each, using up all the filling. Press and smooth the black raspberry filling down into an even layer.
- Top each cake with maple whipped cream, dividing the cream between them - it will be roughly 3 tablespoons per cake. Smooth the cream to fill the top of the muffin cup.
- Cover the top of the muffin pan and assembled cakes with a sheet of plastic wrap and refrigerate the pan overnight or for 8 hours.
Serve the cakes:
- Use a small spoon to pop the mini cakes (in their papers) out of the muffin pan, and place them on a serving platter or individual plates. Drizzle a little maple syrup over the tops. Break the sugar cone that you held aside into pieces and top each cake with pieces of cone. Serve immediately.
- Leftover cakes can be covered and stored in the fridge for up to 3 days. Makes 12 mini icebox cakes.
Notes
- Check the jams carefully. Black raspberry jam can be a little more elusive and sometimes what is more often on the store shelves is blackBERRY jam, which is not the same thing. Black raspberry jam has a much sweeter and fresh-picked-in-the-sun flavor. I found black raspberry jams made by Dickinson's and Smucker's, and also online from Stonewall Kitchen. Just check the labels closely - you'll find it!
- I like to use two cupcake liners for these treats: a plain one on the inside that will get soaked with some of the filling it holds, and a more decorative one on the outside - to look pretty!
- As tempting as it will be to eat the cakes right after assembling, plan ahead to let them sit tightly covered in the fridge overnight. This resting time will let the layers in the cakes meld and set, and the flavors will be even more incredible for the waiting.
Nutrition
Serving: 1serving | Calories: 274kcal | Carbohydrates: 27g | Protein: 1g | Fat: 17g | Saturated Fat: 10g | Cholesterol: 57mg | Sodium: 115mg | Potassium: 71mg | Sugar: 21g | Vitamin A: 660IU | Vitamin C: 0.7mg | Calcium: 45mg | Iron: 0.3mg